Viewer Feature Guide
Purpose
This document outlines the features of the Internet Broadcasting System of Eduvision.tv.
This system allows authorized Channel Managers, Site Administrators, and Contributor to upload Assets that can be used for educational purposes.
Top
Intended Audience
This guide is for the Viewer who can view the free and paid Assets in Eduvision.tv Asset delivery portal.
Top
Prerequisites
Users should have access to a computer with internet access and pre-assigned user name and password to access the Eduvision.tv site. Contact your Site Administrator for these credentials, or to request an Eduvision.tv Subscription, register at www.Eduvision.tv/schoolregister
Users should have access to properly formatted Asset content and associated metadata.
Eduvision.tv currently accepts video files in the following formats:
flv, f4v, mp4, wmv, mov, *avi, m4a, vob, mpg & m4v
*avi files tend to be quite large. It is recommended this file type be transcoded to the mp4 format prior to uploading.
See Recommended Encode Settings for more information.
Top
Home Page Features
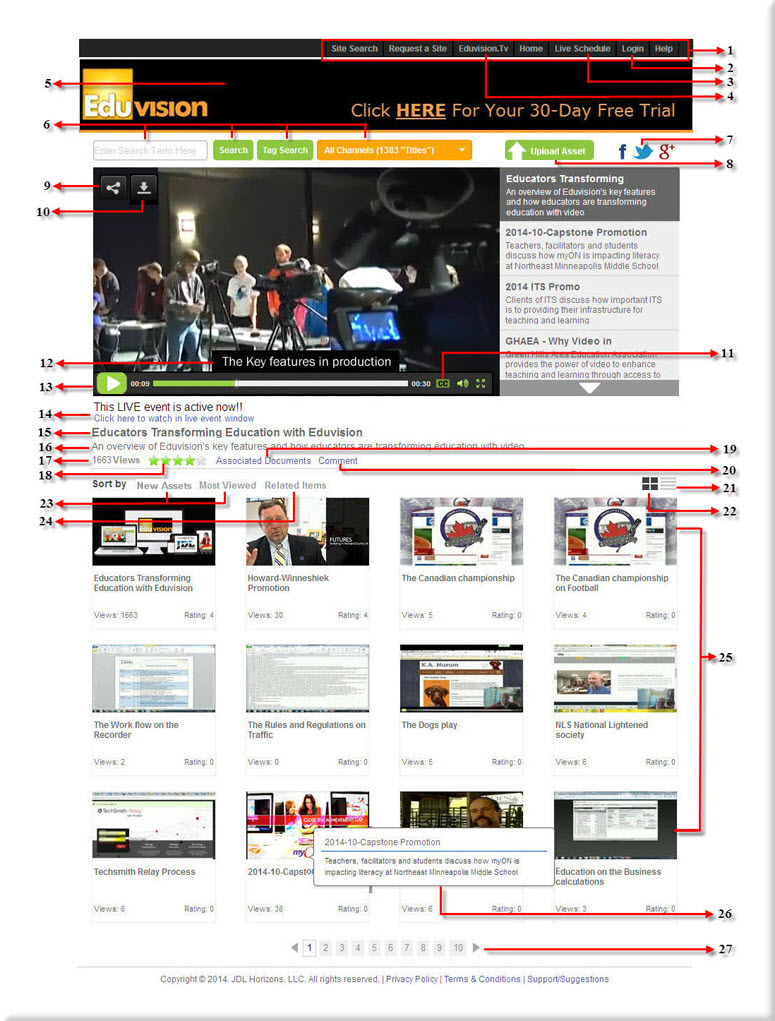
Figure 1 – Home Page Main Features
- Menu
- "Login" - Authorized Users click to login here. See Figure 18 for more information
- View Live Schedule – Click on "Live Schedule" button to view the live event schedule on the site. See Figure 37a for more information.(Exists if Live Event is activated)
- Go To Home Page – Click "Visit Eduvision.tv" button to visit www.Eduvision.tv.
- Site banner.
- Site Search Tool - Search by channel , Search by Keyword within a channel and Tag Search. See Figure 6, Figure 7 and Figure 9 for more information.
- Click "Share" button to Share the particular.
- "Upload Asset" - To upload a Asset, you must have a login else you must get registered. See Figure 20a(Exists if VCC is activated)
- Click "Share" button to Share a Asset. See Figure 13 for more information
- Click "Download" button to download a Asset
- Click "Bookmark" button to bookmark a Asset
- Click "Related Assets" button to view the related Assets
- Displays the recently uploaded Assets
- CC - User can click on CC icon to ON or OFF the Closed captioning
- Subtitle
- Video Control Bar - Offers the user control over the Playback. See Figure 2 Video Control Bar for more information.
- Watch Live event - Click the link to watch the live event
- Asset Title - Displays the Asset’s title.
- Asset Description - Displays information about the Asset.
- Views - Displays the number of time the Asset was viewed. Views will be displayed only if the Asset view count is greater than 75.
- Rating Stars - Displays user ratings on a 1-5 "Star scale". See Figure 3 Five-Star Rating Location for more information.
- Associated Files - Clicking the link can download associated files
- Click "Comment" button to Comment a Asset. Report possible abuse to Site Administrator. See Figure 15 for more information
- List View - Click to display the available Assets in List view
- Grid View - Click to display the available Assets in Grid view
- Asset Sorted Tool – Sort by Most viewed or newest New Assets See Figure 10a and Figure 10b for more information.
- Available Asset list - Displays the List of approved Assets.
- Asset Popup – Appears after mouse over the Asset thumbnail. Displays: Asset Title, Description. See Figure 11 for more information.
- Asset List Page Index - Displays the number of pages consisting of various Asset titles. Clicking the number jumps to that Particular Page.
Top
Video Control Bar

Figure 2 – Video Control Bar
- "Play & Pause" button. Clicking this toggles between playing and stop the video.
- Elapsed Time Indicator. Displays how much of the video has been played.
- Play Progression Indicator. Shows how much of the video has been played in a linear scale. Can be moved forward and backward to jump to different points in the selected video.
- Remaining Time Indicator. Displays the amount of time remaining to play.
- Closed Captioning Button. Clicking this toggles between turning On and Off the subtitles of the particular video
- Volume Control. Click the "Volume" button to adjust the Speaker volume. This does not change the computers audio volume. If the user's computer is muted, this control will not change the system control panel settings.
- "Full Screen" Button. Allows the viewer to expand the video window to full screen. Pressing this button when in Full screen mode, or pressing the "esc" key, returns to the normal player window.
Top
Five-Star Rating Display

Figure 3 – Five-Star Rating Display
When a Asset is selected, the current average of all ratings for that title will be displayed in a one to five star indicator.
Users can click on the stars to register their own rating of the Asset content. The next figure shows the rating options.

Figure 4 – Five-Star Rating Location
Click your mouse over the stars to set your rating. The stars turn Yellow when they are "moused over". When the mouse is released, the rating will be recorded. Only one rating is allowed per browser session.
Once the rating is recorded, the user receives the "Thanks for rating" message.
Top
Site Search Tools

Figure 5 – Site Search Tools
Above the Asset player Site Search Tools option is present.
These tools allow the user to filter the Assets on the site by keyword, channel.
Top
Search by Channel

Figure 6 – Search by Channel Drop-down Box
- Channel
- Sub Channels
To search by Channel, click the "Dropdown Box", drag your mouse to the desired Channel.
When you release the mouse, the search for that Channel will be initiated and the results will be displayed below the search tools.
The Sub-Channels are also listed below the respective Channels, so as to display the particular Assets of the sub-channels below the search tools.
Top
Search by Keyword within a Channel

Figure 7 – Search by keyword within a channel
To search by keyword, enter one or more words and click the "Search" button.
If you want to search a specific channel with a keyword, enter your keyword & select the channel.
This will execute the search for the keyword within the channel you have selected.
There is Quoted Search option. For eg:Enter "ASAA Assets" put it in quotes so you would only get returns on the exact term.
Top
Search For Live

Figure 8 – Search for Live
Search for Live:
- Click on "Live Schedule" in the menu bar to view the live games.
- Select Live Event Schedule in the Channel dropdown to view the live games.
Top
Tag Search

Figure 9 – Tag Search
- Topic name. The number in the () indicates the total number of Assets under the topic
- Criteria Name. The number in the () indicates the total number of Assets under the Criteria.
- Clicking "Search" button will list the Asset appropriate to the criteria selected in home page.
- Click "Cancel" button if you don’t want to search any Asset.
Top
Asset Sorting

Figure 10a – Sort by Most Viewed
- Sorted by – Most Viewed
- Sorting order is in terms of view count. Basically the Assets which has most number of views will listed first

Figure 10b – Sort by New Assets
- Sorted by – New Assets
- Most Recently uploaded Assets will be listed first

Figure 10c – Sort by Related Assets
- Sorted by – Related Assets
- Related Assets will be listed first
Top
Asset List Details

Figure 11 – Asset Tool Tip
When a user "hovers" the mouse over the thumbnail, the pointer will displays additional information about that Asset.
- Asset Title.
- Asset Description.
When a Asset is selected, the Asset details are displayed below the player

Figure 12 – Asset List Details
- Upload Asset (Exists if VCC is activated)
- Page Share
- Displays the recently uploaded Assets
- Asset share
- Download a Asset (Exists if Download Enable for the particular Asset)
- Click "Bookmark" button to bookmark a Asset
- Click "Related Assets" button to view the related Assets
- Play the Asset
- Watch live event
- Asset Title
- Asset Description
- Total Number of times a particular Asset was viewed (Assets with view count greater than 75 will be displayed)
- Current Average Rating
- Associated Files
- Comment
Top
Share – Recommend To a Friend

Figure 13 – Recommend to a friend
Top
Associated Files

Figure 14 – Associated-Files
- Asset Title - Displays the Title of the Asset.
- Title - Displays the Associated File title.
- Description - Displays the Description of the File.
Top
Submit your Comments here

Figure 15 – Comments
To Enter your comments, please click the Comment icon.

Figure 15a – Comments
- Enter your comments in Comments Text box.
- Click Submit Button to Save your Comments.
- Click Close Button to Exit.
Top
Password Asset

Figure 16 – Password Tooltip
When a user "hovers" the mouse over the thumbnail, the pointer will displays additional information about that Asset.
- Asset Title
- Asset Description
- Password Asset

Figure 16a – Password Asset
- Enter the Password and Click Submit button to watch the Password Asset
- Click Close to see default Asset
Top
Price Asset

Figure 17 – Price Tooltip
When a user "hovers" the mouse over the thumbnail, the pointer will displays additional information about that Asset.
- Asset Title
- Asset Description
- Price Asset
Top
Payment Screen

Figure 17a – Payment Preview Screen
- Click Buy Now to sign in or register and pay.
- Click Close to return back to the portal.
Top
Payment Screen

Figure 17b – Payment Screen
- Name on credit card - Enter the Name on credit card
- Card Type - Select the Card Type
- Card Number - Enter the Card Number
- Expiration Date - Select the Month and Year from the dropdown list
- Security Code - Enter the Security Code
- Street Address - Enter the Street address
- City - Enter the City Name
- State - Select the State from the Dropdown List
- Zip Code - Enter the Zip code
- Click 'Make Payment' button to Watch the Asset or Live
- Cancel - Click Cancel to Cancel the payment
Top
Login

Figure 18 – Sign in Login Screen
Clicking on the "Login" tab gives administrative personnel access to a variety of back-end functions, each of which will be explained in the pages that follow.
When the "Login" tab is clicked, the log in screen appears.
Enter your assigned User Name and Password and press "Enter" or click the "Login" button to access the Control Panel.
You can click the "Can't Sign In?" button to recover the username or password associated with your User Name. You must either know your Email ID or User Name to recover the username or password associated with your User Name.
Top
Recover User Name or Password

Figure 19 – Recover User Name or Password Screen
To recover user name - For the registered user:
- Enter Your Email Address as given in the registration page.
- Type the Verification code as you see in CAPTCHA image [letters in a distorted picture].
- Click the "Mail Me" button. A List of usernames associated with the Email Address will be mailed to you.
To recover password - For the registered user:
- Enter your User Name.
- Type the Verification code as you see in the CAPTCHA [letters in a distorted picture] image.
- Click "Mail Me" button to receive an email containing your password.
Top
New User Registration

Figure 20 – Login Screen
Clicking Login redirects to Login screen.
- If you have already registered at this site you can sign in with the ID you have already created
- If you are a new user, fill the form given below

Figure 20a – User Register Screen
- Enter the First name and Middle name of the User.
- Enter the Last name of the User.
- Enter the User Name. Click "Click to see if User Name is Available" link to check login availability.
- Enter the password.
- Re-Enter the Password in Confirm password.
- Enter Email Id of the User.
- Enter Phone number of the User.
- Enter Alternate phone number of the User.
- Type the verification code as you see in the CAPTCHA image [letters in a distorted picture]. To get a new verification code Click the "Get new verification code" link.
- Select the check box to accept the terms and conditions given in the "Terms and Conditions" link.
- Click the "Submit" button to save the details or "Cancel" to clear the details. Once the user is registered successfully, it redirects to welcome page.
Top
Roles and Administrative Rights of Viewer
Modify "My Account"
- Edit the User Name and Contact Information
- Change Password
Top
Control Panel for Viewer

Figure 21 – Control Panel menu
After logging in, the Viewers are presented with a variety of tools for administration via the "Control Panel". Depending upon the Roles and Administrative Rights of the Viewer, different functions will be accessible.
Viewer - The Viewer can access the following Control Panel menu:
Top
My Account
Selecting "My Account" allows the user to update their contact information.

Figure 22 – My Account Edit Details
- Enter the change to be made in the First name and Middle name of the User.
- Enter the change to be made in the Last name of the User.
- Enter the Old Password.
- Enter the new password.
- Re-Enter the password to confirm it.
- Enter the change to be made in the Email Id.
- Enter the change to be made in the Phone number.
- Enter the change to be made in alternate phone number.
- The role of the account holder is displayed.
- Trusted User displayed will be Yes or No according to the Site Admin
- Update the changes made by clicking the "Update" button
- Click the "Cancel" button if you don’t want to save the changes
Top
Payment History

Figure 23 – Payment History Menu

Figure 24 – Payment History
Top
Asset Management
Site Administrator can enable or disable the ability to display a tab or button for viewers to upload Asset content.

Figure 25 – Asset upload Control Panel
Top
Upload Asset

Figure 26 - Title/Desc Screen
- Asset Title - Enter the Title for the Asset you want to upload.
This should include enough information to identify the Asset.
- Description - Enter the Description about the Asset
- Unpublished Keywords - Enter the keywords which will help the user to
browse the connected Asset through “Keyword Search” feature of the player
- Next - Enter the Next to move next option

Figure 26a - Channel & Upload Screen
- Channel - Select one or more Channels under which you want to upload the Asset from the list
- File Upload -Click the "Choose file" button to locate the file to upload. The system accepts files in these formats: flv, f4v, mp4, wmv, mov, avi, m4a, vob& mpg.
- Select CC File - Click the browse button to upload Closed Captioning to Asset. The system accepts files in srt format
- Select Thumbnail File - Click the browse button to upload Thumbnail files. The system accepts files in these format : jpg,jpeg,gif and png
- Click 'Add More' button to add multiple thumbnail.
- Select Large Image for Embedded Player(s) - Click the checkbox and Click Browse button to upload Embed Image
- Click "Save/Upload Changes" to upload the file.
- Click "Cancel" button if you don’t want to upload Asset

Figure 26b - Tag Search Screen
- Tag Search Topic
- Select the appropriate criteria you want to map your Asset to and then click the "Save Changes" button.

Figure 26c - Video Bookmarks Screen
- By uploading Video file, the system allows you to add Bookmark feature.

Figure 26d - Video Upload Screen
- Title - Enter the Title for the Video Bookmarks.
- Timestamp- Enter the Timestamp for the Bookmark.
- Image-click "Image" button to upload the videoBookmark files.
- Click "Save/Upload Changes" to upload the file.
- Click "Cancel" button if you don’t want to upload Asset

Figure 26e - Photoshow Images Screen
- By uploading Image file, the system allows you to add Photoshow feature.

Figure 26f - Image Upload Screen
- Photo show duration - The number of seconds each image will be displayed. If not specified, the value set in the site configuration will be taken into account.
- Add Image File-click the choose file button one or more image added.
- Link - Enter the URL associated with this image. The user's will be redirected to this URL on clicking the image in home page. Eg.http://www.domain.com or http://domain.com.
- Click "Add Image to Photoshow" to add new photoshow image.
Upload Tag Search/Associated Documents
On clicking "Save Changes" button the current page will be redirected to the Tag Search/Upload Changes Page.

Figure 27 – Tag Search/Associated Documents
- Click "Tag Search" to list all the search topics and criteria’s.
- Click "Upload Associated Documents" to upload files to support your Asset.
- Click "Direct Link and Embed Codes" to Generate Embed Codes to your Asset.
- Click "Save Changes" to update changes made here.
- If you don’t want to add any criteria’s or associated files then click “Done” button

Figure 27a – Tag Search Options
- Tag Search Topic
- Select the appropriate criteria you want to map your Asset to and then click the "Save Changes" button.

Figure 27b - Upload Associated Documents
- Name of the file.
- Description about the file.
- Click “Browse” button to Upload Associated Documents.
- For more files click "Add more". You can upload a maximum of 5 associated files to support your Asset and then click "Save Changes" button to upload the associated files.
- Click "Done" button once when finished with the changes
Note : Once the Asset is uploaded, the Channel Owner of that channel would receive an Email Notification. This Email Notification will also include the Uploaders Mail ID.The Channel Manager has to review the Asset and approve it.
Top
Direct Link and Embed Codes

Figure 27c - Embed / Overlay Codes
- Embedded player - Select Width & Height and Click "Generate" button
- Click the "Copy the code" button to copy the code and Save as html
- Overlay Thumb Image - Select the Width & Height
- Overlay Player - Select the Width & Height of the Player
- Click the "Generate" button
- Click "Copy the code" button to copy and Save as html
- Popup Player - Enter the Popup Link Text and Select the Width & Height
- Click the "Generate" button
- Click "Copy the code" button to copy and Save as html
Top

Figure 27d - Direct / Popup Codes
- Direct Player link - Click the "Copy the code" to copy the direct Player link of the Asset
- Direct link - Click the "Copy the code" to copy the direct link of the Asset
Top
My Assets
My Assets will show the list of Assets uploaded by the user. Then the Assets can be managed, replaced and assign the tags. The Assets can be approved only by the Owner of the Channel and the Site Admin.

Figure 28 - My Assets Menu Selection

Figure 28a - My Assets List
- Asset Search Tools
- Enter the search term to find a particular Asset by keywords included in the title or description.
- To search by Channel, click the "Dropdown Box" and select the desired Channel.
- Approve - The Approve of Asset will be done by the Owner of the Channel and the Site Admin
- This Column displays the Thumbnail assigned to each Asset.
- Title – Displays the title of the Asset.
- Channel – Displays the corresponding Parent(P),Child(C) and Leaf(L) Channels assigned to each Asset.
- Click "Edit" link to edit the Asset metadata or change thumbnail.
- Click "Tag" link to edit the Tag Search criteria. See Figure 9 for more information.
- Click "Play" link to display the Asset in a new preview window and Click "Codes" link to display the player tools in a window. See Figure 27c for more information.
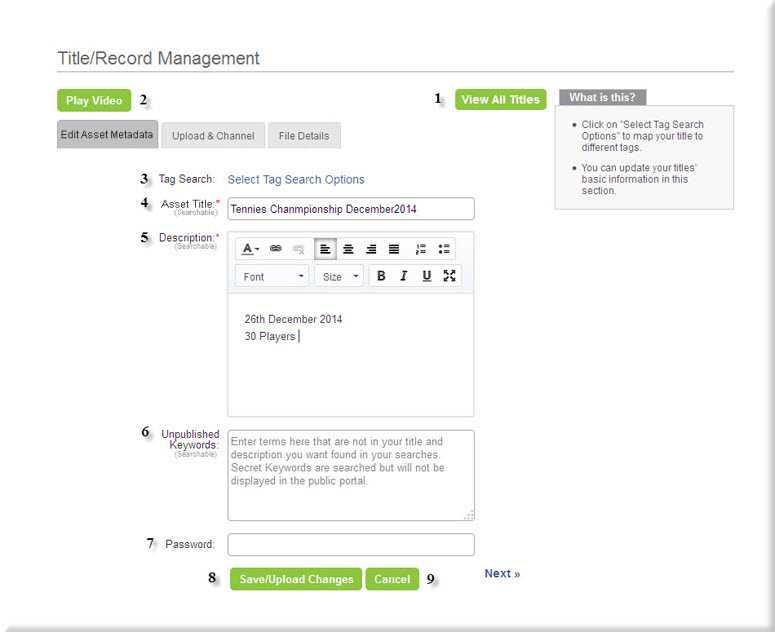
Figure 28b -Edit My Asset Details
- Download asset-click the download asset button to download image.
- Play-view asset-Click the "Play Asset" button to play the Asset in a pop-up window
- "View All Titles " link returns to the My Assets Screen
- Tag Search options. You could choose the Tag Search tool to add more pre-defined metadata for searching and indexing. See Figure 9 for more information.
- Asset Title – Allows SA or CM to edit the Asset title.
- Asset Description – Allows SA or CM to edit the Asset description.
- Unpublished Keywords - Enter terms, not included in the title or description that will help the user to find the title
- Password – If you want viewers to enter a password to view, enter it here (Optional)
- Click "Save/Upload changes" button to update your changes.
- Click "Cancel" button to abandon changes and return to the My Assets Screen.

Figure 28c -Edit Upload and Channel
- Displays the title of the Asset
- Associated Documents - Click this link to Upload Associated Documents. See Figure 27b for more information.
- Channel-Select the check box of the particular Channel with which you want to assign the Asset file.
- Replace Asset file - Click browse button to upload Closed Captioning to the Asset
- Add photoshow image-Click here to add more images to create a photoshow
- Thumbnail-Displays the Current Thumbnail of the Asset
- Click 'Add More' button to add multiple thumbnail.
- Embed player Image File
- Click "Save/Upload changes" button to update your changes.
- Click "Cancel" button to abandon changes and return to the My Assets Screen.

Figure 28d -Asset File Details
- Photoshow duration-Number of second each image will be displayed.if not spcified,value set in the site configuration will be taken into the account.
- Add Image file-click the button one or more will be added.
- Link-Enter the URL associated with this image.
- Click " Add Image to Photoshow " button to add Image.
- Click "Save/Upload changes" button to update your changes.
- Click "Cancel" button to abandon changes and return to the My Assets Screen.

Figure 28e -Asset File Details
- Display the Asset Title.
- Display the Uploader name.
- Display the Uploader Role.
- Display the Uploader E-mail Id.
- Display the Uploaded Date
- Display the Last Uploaded Date
- Display the Last Uploaded Name
- Display the Asset File Name.
- Display the Thumbnail File Name.
- Display the Embed Player Image File Name.
- Display the Closed Caption File Name.
- Display the View Count Details.
- Display the Last Viewed Date.
- Display the Rating.
Top
Live Event Management
Live Events can be created and managed by, Site Administrator, Live Administrator, and any user account that has the "Live Event Management" check box enabled. If "Live Event Management" is enabled for your account please contact site administrator for more information on how to manage Live events.
Create Live Schedule

Figure 29 - Create Live Event Menu Selection

Figure 30 - Create Schedule
- Enter the Title of the Schedule
- Enter the Description of the Schedule
- Choose the Time Zone of the event
- If Other Non US, You can choose Other Non US Time Zones from the Drop Down List
- Enter the start date and time of the live event. Choose time from the time picker. Be sure to specify am or pm
- Enter the end date and time of the live event. Choose time from the time picker. Be sure to specify am or pm
- Click the "Next " Button to chanel manager
Top

Figure 30a - Create Schedule
- Click and Select the Live Channel from the list
- Click “Save” button to save the changes in the database.
- Click “Cancel” button to cancel the entered details.
Top

Figure 30b- Create Schedule
- Click "Browse" button and select the Live event image for the Live
- Set password for the live event.
- If checked, It will Display in Default Page when Live event is activated.
- If checked, will list the Assets in Schedule page.
- If checked, Enables the PPV option
- check for Free Event/ VoD Registration.
- Check for creating Event recurring Pattern.
- Select PPV group - Select PPV group for live Event
- Click Checkbox to Enable Comment.
- Click “Save” button to save the changes in the database.
- Click “Cancel” button to cancel the entered details.
Top

Figure 30c - Create Schedule
- You can set your own recurring pattern here for the event.
Top
Edit Event

Figure 31 – Edit Schedule Screen

Figure 32 – Edit Existing Schedule Screen
On clicking the edit link "Edit Existing Schedule" page will be shown.
- Edit event name.
- Edit event description.
- Choose the Time Zone of the event, You can choose Other Non US Time Zones from the Drop Down List
- Other Non US Time zone -Displays other than US times.
- Enter the start date and time of the live event. Choose time from the time picker. Be sure to specify am or pm
- Enter the end date and time of the live event. Choose time from the time picker. Be sure to specify am or pm
- Click “Update” button to update the changes in the database.
- Click “Cancel” button to cancel the entered details.

Figure 32a – Edit Existing Schedule Screen
- Select Live Channel
- Select Live Managers
- Click “Update” button to update the changes in the database.
- Click “Cancel” button to cancel the entered details.

Figure 32b – Edit Existing Schedule Screen
- Display Thumbnail image.
- Click Checkbox to Remove thumbnail Image
- Click "Choose File" button to choose Live event Image.
- Enter the Password to Viewer to watch.
- Click Checkbox to make default when live.
- Click Checkbox to List in Schedule.
- Click Checkbox to Enable PPV.
- Select Asset - Select the Asset/Live Group
- Click Checkbox for Free Event/VOD schedule.
- Click Checkbox for Recurring Schedule.
- Customize the Registration Form
- Click Checkbox to Enable Comment.
- Select Stream name
- Click “Update” button to update the changes in the database.
- Click “Cancel” button to cancel the entered details.

Figure 32c – Edit Existing Schedule Screen

Figure 33 – Manage Comments
On clicking the manage comment link "Live Comments" page will be shown.

Figure 34 – Edit Live Comments
- Approve Checkbox - SA or Admin Can manage comments by approving for public view.
- Delete Checkbox deletes the comments
Top
Manage Event
On clicking "Manage Broadcast" link the current page will be redirected to the Live Broadcast page to view live events.

Figure 35 – Broadcast Settings
- Asset Preview Window – Displays Asset being broadcast via Eduvision.tv without publishing to the public. Requires Flash Media Encoder to stream to scheduled live event.
- “Play” button and Control bar – Starts and stops preview of live broadcast without going live to the public.
- Metadata for live event.
- Server Name: Copy and paste into Flash Media Encoder.
- Stream Name: Copy and paste into Flash Media Encoder.
- Password: Copy and paste into Flash Media Encoder.
- "Start Live Event" button –Starts the live broadcast to the public. Push this to start the live broadcast. Once "Publish" has been clicked, Flash Media Encoder is used to stop and start the Asset feed.
Top
Past Schedule
On clicking the "PastSchedule" tab the events that were completed on the current date will be shown in the table.

Figure 36 – Past Schedule
Top
Viewing the Live Broad Cast
End Users view the live broadcast by selecting….

Figure 37 - Watch Live Event Menu Selection
Selecting “Live Schedule” presents the screen below.
Top

Figure 37a - Live Broadcast Selection
End Users can watch any published live event by clicking on the "Watch Now" button.
Price Live
- Click the Watch now button to make the Payment
- Click the Preview button to Preview the Asset and Make the Payment
- Click Prepay button - It will redirect to Payment Screen, See Make Payment for more information
Top

Figure 37b - Live View Screen
To Enter your comments, please Click the Comment icon.
Top

Figure 37c - Live Comments
- Enter your comments in Comments Text box.
- Click 'Make Payment' to Save your Comments.
- Click Close Button to Exit.
Top
Table of Figures
Top